

Table of Contents
Mastering Shutter Priority Mode: Capture Stunning Motion Effects
Shutter priority mode is one of the most useful and versatile modes on your camera. It allows you to control the shutter speed while the camera adjusts the aperture and ISO automatically. This way, you can achieve creative effects such as freezing or blurring motion, capturing sharp images in low light, or creating dramatic light trails.
In this article, we will explain what shutter priority mode is, how to set it up, and how to use it in different scenarios.
Understanding Shutter Priority Mode
Definition of Shutter Priority Mode
Shutter priority mode is a semi-automatic mode that lets you select a shutter speed and lets the camera choose the aperture and ISO values for a correct exposure. The shutter speed is the amount of time that the camera’s shutter is open, allowing light to reach the sensor. The shutter speed is measured in seconds or fractions of a second, such as 1/1000s, 1/60s, or 1s.
Key Takeaways | Shutter Priority Mode
- Shutter priority lets you select a shutter speed and lets the camera choose the aperture and ISO values for a correct exposure.
- Gives you more creative control over how you capture motion in your images.
- Helps you avoid camera shake by choosing a fast enough shutter speed.
- Simplifies your exposure settings by letting the camera do the rest.
- Can be used in different scenarios where you want to control how motion is captured in your photos.
- Can affect your aperture choice and depth of field depending on your chosen shutter speed and lighting conditions.
- Can affect your ISO choice and image quality depending on your chosen shutter speed and lighting conditions.
- Has some limitations that you should be aware of and know how to solve.
Benefits of Using Shutter Priority Mode
Using shutter priority mode has several benefits for photographers:
- It gives you more creative control over how you capture motion in your images. You can choose a fast shutter speed to freeze the action or a slow shutter speed to create motion blur.
- It helps you avoid camera shake, which is the unwanted blur caused by the movement of your hands or camera while taking a photo. By choosing a fast enough shutter speed, you can ensure that your images are sharp and clear.
- It simplifies your exposure settings by letting the camera do the rest. You don’t have to worry about changing the aperture and ISO manually, which can be time-consuming and confusing. The camera will automatically adjust them to match your chosen shutter speed.
Setting Up Shutter Priority Mode
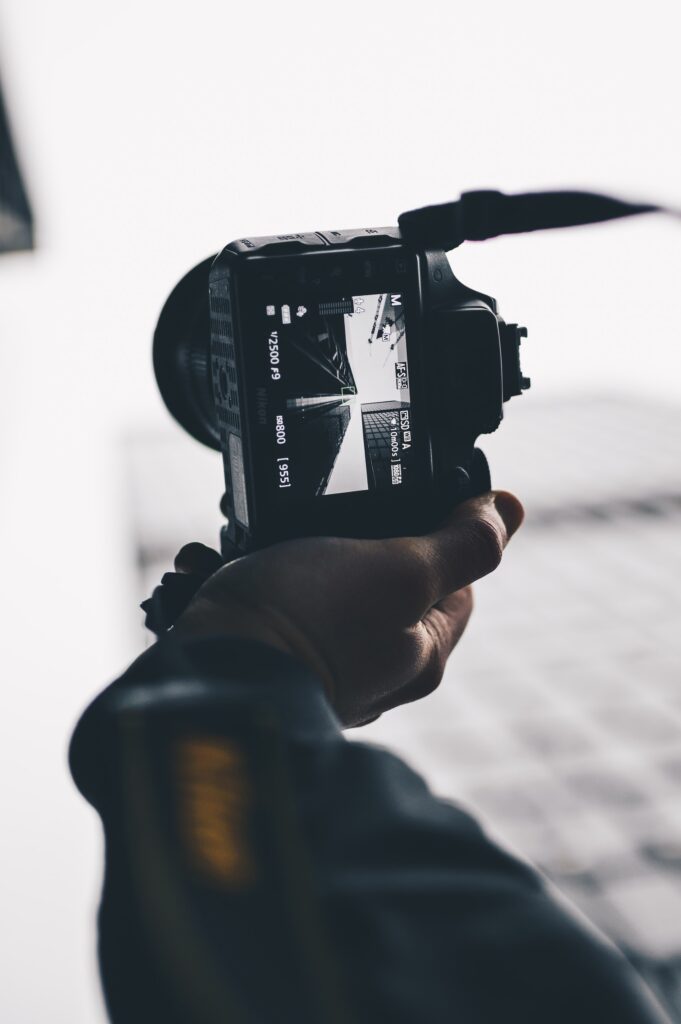
Guide to set shutter in your camera
To set up shutter priority mode on your camera, follow these steps:
- Turn your camera on and locate the mode dial on the top or back of your camera. The mode dial is where you can select different shooting modes, such as auto, manual, aperture priority, or program mode.
- Rotate the mode dial until you see the symbol for shutter priority mode. Depending on your camera brand, this symbol may be S (for Shutter), Tv (for Time Value), or T (for Time).
- Use the main dial or the arrow buttons to change the shutter speed value. You will see the shutter speed displayed on the LCD screen or in the viewfinder. You can also use the exposure compensation button to adjust the brightness of your image if needed.
- Press the shutter button halfway to focus and meter your scene. You will also see the aperture value that the camera has chosen for you. If the aperture value is blinking, it means that the camera cannot achieve a correct exposure with your chosen shutter speed. You may need to change the shutter speed, ISO, or lighting conditions.
- Press the shutter button fully to take the photo.
Controlling Shutter Speed
Applying Shutter Priority Mode in Different Scenarios
Shutter priority mode can be used in various situations where you want to control how motion is captured in your photos. Here are some examples:
Use Shutter Priority Mode for Fast Moving Subjects
If you want to photograph fast moving subjects, such as sports, wildlife, or children, you can use shutter priority mode to choose a fast shutter speed that will freeze their movement. A fast shutter speed is usually anything above 1/250s, depending on how fast your subject is moving. For example, if you want to photograph a bird in flight, you may need a shutter speed of at least 1/1000s.

To use shutter priority mode for fast moving subjects:
- Set your camera to shutter priority mode and select a fast shutter speed.
- Use continuous autofocus (AF-C) and burst mode to track and capture your subject’s movement.
- Use a telephoto lens or zoom in to get closer to your subject.
- Use a wide aperture (low f-number) to create a shallow depth of field that will isolate your subject from the background.
How to Effectively Use Shutter-priority for Night Photography
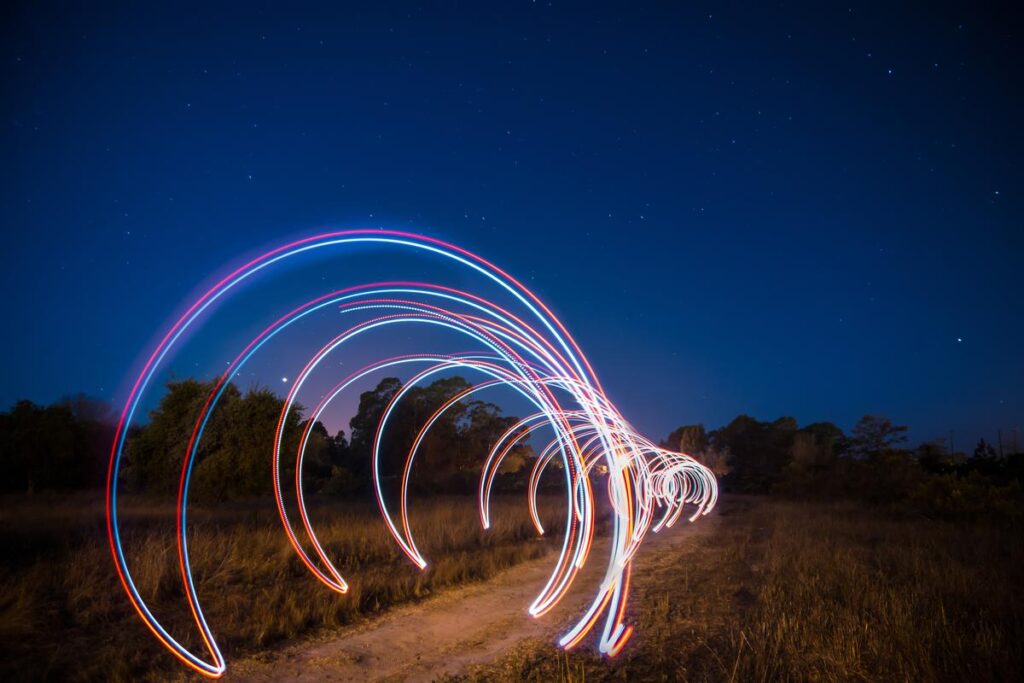
If you want to photograph night scenes, such as cityscapes, fireworks, or stars, you can use shutter priority mode to choose a slow shutter speed that will capture more light and create interesting effects. A slow shutter speed is usually anything below 1/60s, depending on how dark your scene is. For example, if you want to photograph light trails from cars or trains, you may need a shutter speed of several seconds.
To use shutter priority mode for night photography:
- Set your camera to shutter priority mode and select a slow shutter speed.
- Use manual focus (MF) and a remote control or self-timer to avoid touching your camera while taking the photo.
- Use a tripod or a stable surface to keep your camera steady and avoid camera shake.
- Use a narrow aperture (high f-number) to create a deep depth of field that will keep everything in focus.
ISO in Shutter Priority Mode
Understanding ISO Role in Shutter Priority Mode
ISO is the third element of the exposure triangle, along with shutter speed and aperture. ISO is the sensitivity of your camera’s sensor to light. The higher the ISO, the more sensitive the sensor is, and the brighter your image will be. However, a higher ISO also introduces more noise or grain to your image, which can reduce its quality.
In shutter priority mode, the camera will automatically adjust the ISO to match your chosen shutter speed and achieve a correct exposure. However, you can also manually set the ISO or use Auto ISO to have more control over the image quality and brightness.
Auto ISO and Shutter Priority Mode
Auto ISO is a feature that allows you to set a range of ISO values that the camera can choose from automatically. For example, you can set the Auto ISO range from 100 to 1600, and the camera will select the best ISO value within that range for each shot.
Auto ISO can be useful in shutter priority mode when you are shooting in changing light conditions or when you want to maintain a consistent brightness level. For example, if you are shooting indoors and outdoors, or if you are shooting at different times of the day, Auto ISO can help you avoid underexposed or overexposed images.
To use Auto ISO in shutter priority mode:
- Set your camera to shutter priority mode and select your desired shutter speed.
- Enable Auto ISO and set the maximum and minimum ISO values that you want the camera to use.
- Optionally, you can also set a minimum shutter speed that you want the camera to maintain. For example, if you don’t want the camera to use a shutter speed slower than 1/60s, you can set that as the minimum shutter speed. The camera will then increase the ISO or aperture to avoid using a slower shutter speed.
ISO and Exposure Compensation in Shutter Priority Mode
Exposure compensation is a feature that allows you to adjust the brightness of your image by telling the camera to overexpose or underexpose your shot. Exposure compensation is measured in stops or EV (exposure value), such as +1 EV or -2 EV. A positive exposure compensation will make your image brighter, while a negative exposure compensation will make your image darker.
Exposure compensation can be useful in shutter priority mode when you want to override the camera’s exposure metering or when you want to achieve a certain mood or effect. For example, if you want to create a silhouette or a high-key image, you can use exposure compensation to make your image darker or brighter.
To use exposure compensation in shutter priority mode:
- Set your camera to shutter priority mode and select your desired shutter speed.
- Press the exposure compensation button and use the main dial or the arrow buttons to change the exposure compensation value. You will see the exposure compensation scale on the LCD screen or in the viewfinder.
- Press the shutter button halfway to see how the exposure compensation affects your image. You will also see how the camera changes the aperture and ISO values accordingly.
- Press the shutter button fully to take the photo.
Interplay of Aperture and Shutter Priority
How Aperture Influences Shutter Speed
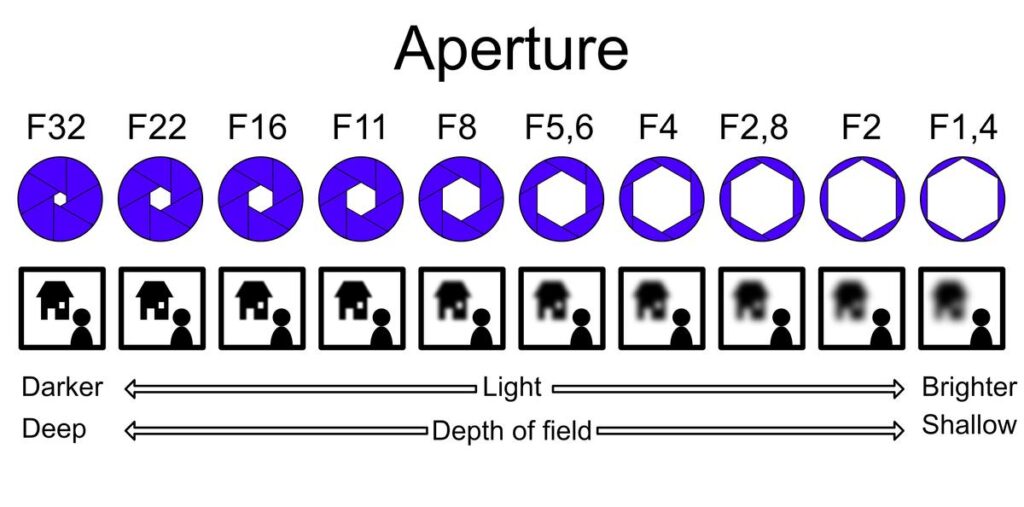
Aperture is another element of the exposure triangle, along with shutter speed and ISO. Aperture is the opening of your lens that controls how much light enters your camera. The aperture is measured in f-numbers, such as f/2.8, f/8, or f/16. The lower the f-number, the wider the aperture is, and the more light it lets in. The higher the f-number, the narrower the aperture is, and the less light it lets in.
Aperture also affects the depth of field of your image, which is how much of your scene is in focus. A wide aperture (low f-number) creates a shallow depth of field that blurs out the background and foreground. A narrow aperture (high f-number) creates a deep depth of field that keeps everything in focus.
In shutter priority mode, the camera will automatically adjust the aperture to match your chosen shutter speed and achieve a correct exposure. However, you can also manually set the aperture or use Aperture Priority Mode to have more control over the depth of field and light.
Impact of Shutter Priority Mode on Aperture Choice
Shutter priority mode can affect your aperture choice in two ways:
- It can limit your aperture range depending on your chosen shutter speed. For example, if you choose a very fast shutter speed, such as 1/4000s, you may not be able to use a very narrow aperture, such as f/22, because there may not be enough light for a correct exposure. Similarly, if you choose a very slow shutter speed, such as 30s, you may not be able to use a very wide aperture, such as f/1.4, because there may be too much light for a correct exposure. Therefore, you may need to adjust your shutter speed or ISO to use the aperture that you want.
- It can affect the depth of field of your image depending on the aperture that the camera chooses for you. For example, if you choose a fast shutter speed to freeze a moving subject, the camera may choose a wide aperture to let in more light. This will create a shallow depth of field that will blur out the background and foreground. Similarly, if you choose a slow shutter speed to create motion blur, the camera may choose a narrow aperture to reduce the light. This will create a deep depth of field that will keep everything in focus.
Aperture Priority Mode is another semi-automatic mode that lets you select an aperture and lets the camera choose the shutter speed and ISO values for a correct exposure. This way, you can choose how much of your scene is in focus and how much is blurred.
Limitations and Solutions of Shutter Priority Mode
Shutter priority mode is not perfect and has some limitations that you should be aware of. Here are some common problems that you may encounter when using shutter priority mode and how to solve them:
- The camera may not be able to achieve a correct exposure with your chosen shutter speed. This can happen when there is too much or too little light for your shutter speed and aperture range. For example, if you want to use a very fast shutter speed in low light, or a very slow shutter speed in bright light, the camera may not be able to adjust the aperture or ISO enough to compensate for the light. In this case, you may see a blinking aperture value or an exposure warning on your screen or viewfinder. To fix this problem, you can either change your shutter speed, ISO, or lighting conditions, or use Manual Mode instead of Shutter Priority Mode.
- The camera may choose an aperture that is not suitable for your desired depth of field. This can happen when the camera prioritizes the exposure over the depth of field. For example, if you want to use a fast shutter speed to freeze a moving subject, but also want to have a deep depth of field that keeps everything in focus, the camera may choose a wide aperture that creates a shallow depth of field instead. To fix this problem, you can either change your shutter speed, ISO, or lighting conditions, or use Aperture Priority Mode instead of Shutter Priority Mode.
- The camera may choose an ISO that is too high or too low for your desired image quality. This can happen when the camera prioritizes the exposure over the image quality. For example, if you want to use a slow shutter speed to create motion blur, but also want to have a low noise level in your image, the camera may choose a high ISO that introduces more noise instead. To fix this problem, you can either change your shutter speed, aperture, or lighting conditions, or use Manual Mode or Auto ISO instead of Shutter Priority Mode.
Conclusion
Shutter priority mode is a great mode to use when you want to control how motion is captured in your photos. It allows you to choose a shutter speed and lets the camera adjust the aperture and ISO automatically for a correct exposure. You can use shutter priority mode for various scenarios, such as freezing or blurring motion, capturing sharp images in low light, or creating dramatic light trails.
However, shutter priority mode also has some limitations that you should be aware of. Sometimes, the camera may not be able to achieve a correct exposure with your chosen shutter speed, or it may choose an aperture or ISO that is not suitable for your desired depth of field or image quality. In these cases, you may need to change your settings or use another mode instead.
We hope this article has helped you understand what shutter priority mode is and how to use it effectively as a photographer. If you have any questions, do let me know in the comments. Happy shooting!